Testing MediaWiki code with PHPUnit
2020-11-01 11:22:38 +0100 +0100Tomorrow On December 7 I’m presenting a Wikimedia tech talk on Testing MediaWiki code with PHPUnit. If you prefer text, here’s the blog post version of what I plan to say :)
EDIT: Slides (Wikimedia Commons, Google Slides)
Intro
I’m Kosta Harlan, a software engineer on the Wikimedia Foundation Growth Team. At the foundation, I’m a participant in Code Health Metrics project, which is overseen by the Code Health Working Group. In general we’re interested in improving code quality and health across projects in the Wikimedia ecosystem, and we’ve worked on various initiatives around code review processes, static analyses, and developer education workshops, among other things. (If this sounds interesting to you and you want to contribute, let us know!)
Also, before beginning, wikilove & quick shoutout to participants in the 2019 Prague Hackathon and other contributors in the Wikimedia movement who helped make proper unit testing in MediaWiki possible. This post has some more context.
What we’re talking about here
How do you know that the code you wrote works the way you think it does? Less intuitively to a discussion about testing: can another human comprehend your code? We’ll talk about unit testing as a means towards those ends.
Different types of tests for MediaWiki
There are lots of ways that MediaWiki code is tested:
- Manual testing. You as the developer are verifying the changes you make via your browser or command line interface to MediaWiki. Time consuming, error prone, but still one of the front lines against regressions and defects.
- Selenium. Tests executed in a browser. The tests follow a plan that involves clicking, inputting text, and otherwise interacting with pages and asserting output. Slow, somewhat brittle, but also very effective in catching bigger changes that other test systems might miss.
- QUnit. JavaScript tests executed in a browser. Much faster than Selenium. Despite the name of the framework, these are more like integration tests in that they have access to global state.
- api-testing. Test framework built for interacting with MediaWiki’s REST API. Looks at inputs/outputs to the API and doesn’t cover particular components of the code involved in that I/O.
And lastly: PHPUnit.
Clarify terminology
First, some terminology. PHPUnit is a testing framework. So, what does a testing framework let you do? At a high level, it provides a runner for executing tests and reporting on them, and a set of rules for how you should define test cases.
What is a test?
Again at a very high level, you have some code that says it does something. A test is a series of actions that exercise the code with various inputs to assert that it works the way it does.
At a very simple level consider this PHP class:
class Calculator() {
  public function add( $a, $b ) {
    return $a + $b;
  }
}
To test this code, you could do something like:
$calculator = new Calculator();
$result = $calculator->add( 2, 2 );
if ( $result === 4 ) {
  echo "Addition works!"
} else {
  echo "Calculator broken"
}
// "Addition works!"
And you could look at the output to see if the result is what you expected.
This not particularly complicated but gets across the core idea: a test is only as good as what you put into it. For example, the add() function might look robust, but what happens if something like this happens:
$calculator = new Calculator();
$result = $calculator->add( new \stdClass(), 2 );
if ( $result === 2 ) {
  echo "Addition works!"
} else {
  echo "Calculator broken"
}
// "Calculator broken" -- \stdClass() is converted to 1 by PHP ¯\_(ツ)_/¯
// with a warning, so the result is 3.
A test it basically a way to pass in different inputs to your code to make sure it’s working as you expect it. For example, if your calculator is supposed to silently discard non-integer types, then $calculator->add( new stdClass(), 2 ) should be “2” and not something else. If it should throw an error when a non-integer type is passed, then your test would check that it returns the correct response.
What’s the diference between a unit and integration test?
The above example and test is an exmaple of unit testable code. Nothing fancy happens in the add() – the calculator class, and its add function, do not depend on any other code. There is no connection to a database, network calls or dependence on the state of the application. Given a set of inputs you the output can be known deterministically.
To draw a distinction between unit test and integration test, let’s make the calculator more complicated.
It’s the year 2020, and basic maths is no longer guaranteed. Instead we need a PoliticalCalculator that extends the base Calculator class; if we’re in “authoritarian mode” then we should know that 2 + 2 always makes a 5.
class PoliticalCalculator extends Calculator {
  public function add( $a, $b ) {
    $result = new \stdClass();
    $result->params = [ $a, $b ];
    $result->type = 'add';
    $result->calculation = $a + $b;
    return validateResult( $result );
  }
}
This looks similar to the normal calculator; we sum two values. But hang on, now we’re passing to a globally defined function, validateResult. Let’s look at the contents of validateResult():
function validateResult( $result ) {
  global $wgAuthoritarianMode;
  if ( $result->type === 'add' ) {
    if ( $result->params = [ 2, 2 ] && $wgAuthoritarianMode ) {
      return 5;
    } else {
      return $result->calculation;
    }
  }
}
So, a couple of things combine here to make unit testing the above impossible:
- The add() code is no longer contained to the class, it invokes global function
validateResult() - The method depends on global state as expressed in
$wgAuthoritarianMode
That means that when you set up your test, you can’t easily control the conditions of your test. Your code depends on application state and code outside of it. If other extensions modify $wgAuthoritarianMode, your validateResult() function may or may not work as you designed it.
Examples of this external dependence in MediaWiki:
- Usages of
global $wg{someVariable}; there are 3,480 files in the MediaWiki ecosystem with usages of$wg{someVariable} - Calls to global functions from
includes/GlobalFunctions.php, e.g.wfGetDB() - Calls to
MediaWikiServices::getInstance()
The result is that in order to test our PoliticalCalculator or loads of MediaWiki code, we need some complicated infrastructure that sets up and tears down global application state, inserts records in the database and removes them after, etc. The result is that the tests are slow to run, difficult to write, and more prone to failure especially in the context of continuous integration where they are interacting with code from dozens or hundreds of other pieces of code which may touch global state.
So, an integration test could be defined as something that tests the way code interacts with the global application state, where global functions and variables are in use, database, file system or network access calls are allowed.
Why prefer unit tests to integration tests?
In contrast to the above, unit tests should know nothing of the global state. As a result they are faster and deterministic, while also encouraging more modular code, smaller functions, and thus easing code review.
Let’s rewrite the PoliticalCalculator so that it’s unit testable.
class PoliticalCalculator extends Calculator {

  private $validator;

  public function __construct( Validator $validator ) {
    $this->validator = $validator;
  }

  public function add( $a, $b ) {
    $result = new \stdClass();
    $result->params = [ $a, $b ];
    $result->type = 'add';
    $result->calculation = $a + $b;
    return $this->validator->validate( $result );
  }
}

class Validator {

  private $mode;

  public function __construct( $mode ) {
    $this->mode = $mode;
  }

  public function validate( $result ) {
    if ( $result->type === 'add' ) {
      if ( $result->params = [ 2, 2 ] && $this->mode === 'authoritarian' ) {
        return 5;
      } else {
        return $result->calculation;
      }
    }
  }
}
And then our usage would change accordingly to:
$validator = new Validator( 'authoritarian' )
$calculator = new Calculator( $validator );
$result = $calculator->add( 2, 2 );
if ( $result === 5 ) {
  echo "Addition works!"
} else {
  echo "Calculator broken"
}
// "Addition works!"
The core idea of passing dependencies in instead of reaching outside is “dependency injection”. It’s a relatively new concept in MediaWiki core and extensions, and that’s why you’ll still see global $wgFoo and wfFoo() calls all over the place, along with calls to MediaWikiServices::getInstance()->getSomeService() in the middle of methods.
We’ll come back to these examples and ideas later in the “Writing unit tests” section.
Running tests
One of the main advantages of using unit tests instead of integration tests is that we can run the test without setting up MediaWiki. And further, our tests should run deterministically regardless of how MediaWiki is setup (content language, extension configuration, database contents, etc).
That means that as soon as you clone MediaWiki you can start running tests, no database installation and setup required.
As mentioned in the terminology section, we’ll be using the PHPUnit test framework and its runner for executing tests. After cloning MediaWiki, running composer update will install PHPUnit’s entrypoint to vendor/bin/phpunit.
Command-line
vendor/bin/phpunit
The simplest way to run unit tests is with vendor/bin/phpunit:
~/src/mediawiki/core $ vendor/bin/phpunit tests/phpunit/unit
PHPUnit 8.5.8 by Sebastian Bergmann and contributors.

.............................................................   61 / 6138 (  0%)
.............................................................  122 / 6138 (  1%)
.............................................................  183 / 6138 (  2%)
[snip]
............................................................. 6039 / 6138 ( 98%)
............................................................. 6100 / 6138 ( 99%)
......................................                        6138 / 6138 (100%)

You should really speed up these slow tests (>50ms)...
 1. 476ms to run Argon2PasswordTest:testPartialConfig
 2. 356ms to run Pbkdf2PasswordTest:testCrypt with data set #0
 3. 353ms to run Pbkdf2PasswordFallbackTest:testCrypt with data set #0
 4. 170ms to run BcryptPasswordTest:testCrypt with data set #0
 5. 158ms to run HashRingTest:testHashRingRatios with data set #0
 6. 136ms to run LayeredParameterizedPasswordTest:testLargeLayeredPartialUpdate
 7. 88ms to run MediaWiki\Tests\Rest\Handler\SearchHandlerTest:testExecuteFulltextSearch
 8. 69ms to run HashRingTest:testHashRingKetamaMode
 9. 68ms to run LayeredParameterizedPasswordTest:testHashing with data set #0


Time: 7.76 seconds, Memory: 114.50 MB

OK, but incomplete, skipped, or risky tests!
Tests: 6138, Assertions: 27983, Skipped: 1.
I’m not going to get into all the options you can pass to vendor/bin/phpunit, but it’s worth running vendor/bin/phpunit --help and checking out the various options that allow you to:
- alter the output format
- stop execution on failure
- allow for filtering by testsuites or groups
- … many more things
The most useful thing to know is that you can run a single test class by specifying the path to that class as an argument: vendor/bin/phpunit tests/phpunit/unit/includes/auth/AuthenticationResponseTest.php.
composer phpunit
For convenience, there is a composer script definition in composer.json that provides the command: composer phpunit:unit. This translates to: vendor/bin/phpunit --colors=always --testsuite=core:unit,extensions:unit,skins:unit. You may be wondering what is the definition of testsuites core:unit, extensions:unit and skins:unit. In phpunit.xml.dist, you can see this configuration:
<testsuite name="core:unit">
	<directory>tests/phpunit/unit</directory>
</testsuite>
<testsuite name="extensions:unit">
	<directory>extensions/**/tests/phpunit/unit</directory>
	<directory>extensions/**/tests/phpunit/Unit</directory>
</testsuite>
<testsuite name="skins:unit">
	<directory>skins/**/tests/phpunit/unit</directory>
	<directory>skins/**/tests/phpunit/Unit</directory>
</testsuite>
The idea is to run all tests that are in tests/phpunit/unit subdirectories across all extensions, skins, and MediaWiki core. Because the unit tests don’t require a full bootstrap of MediaWiki, running all these tests takes just a few seconds. This command (composer phpunit:unit) is executed by Quibble in our CI.
tests/phpunit/phpunit.php
There is also a wrapper script that is in the tests/phpunit directory. It is invoked with php tests/phpunit/phpunit.php. My advice is to avoid it for unit tests. It is also not really needed for integration tests. It is designed to do a lot of additional work in bootsrapping MediaWiki for integration tests (setting up database tables, overriding global services, etc) and we don’t need any of that for our unit tests.
IDE
It’s useful to know how to execute the tests via the command line, but you probably don’t write PHP code from your terminal.1 So, if you’re writing code in a text editor or an IDE, switching back and forth to the terminal is a context switch, and the friction entailed in the context switching also means that eventually you’ll probably rely less on running the tests.
If you’re using an IDE like PhpStorm, there are powerful integrations built in to the interface to make (re)running and debugging your tests intuitive and easy.
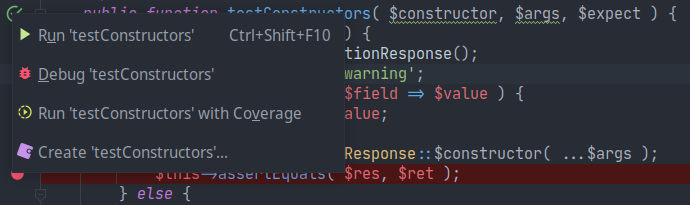
When viewing a test, you’ll see a “Play” icon next to each test function, and a fast-forward icon next to the class definition.
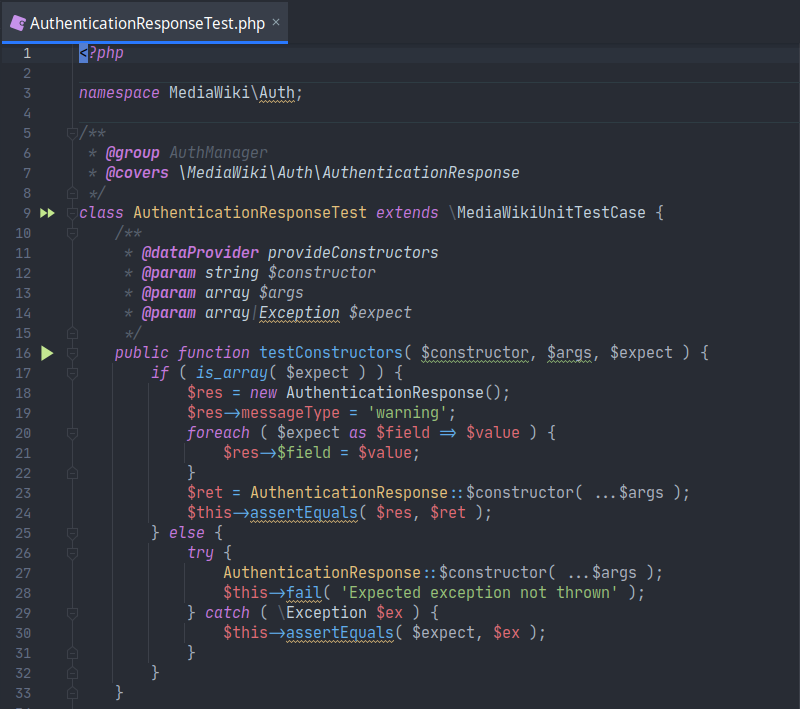
Clicking on those icons let’s you execute the test for the function or all tests defined in the class.
But, after clicking “Run” we see an error dialog. This is because we haven’t yet told PhpStorm what PHP interpreter to use for running the tests.
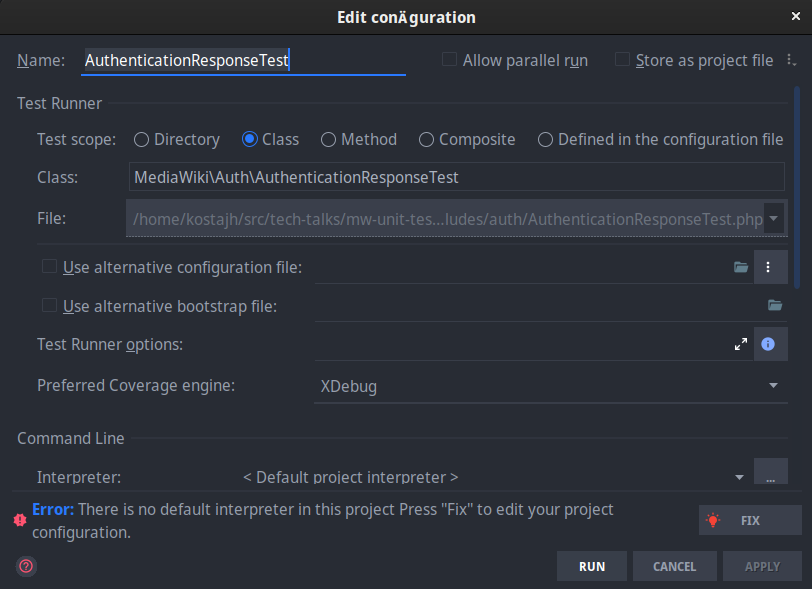
So you can press “Fix” and select your host’s PHP interpreter:
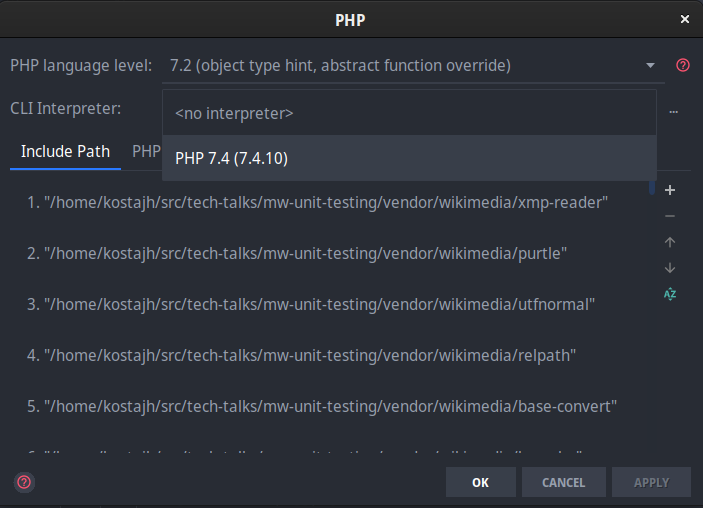
Now we press “Run” to execute the test. But there’s another problem after doing so:
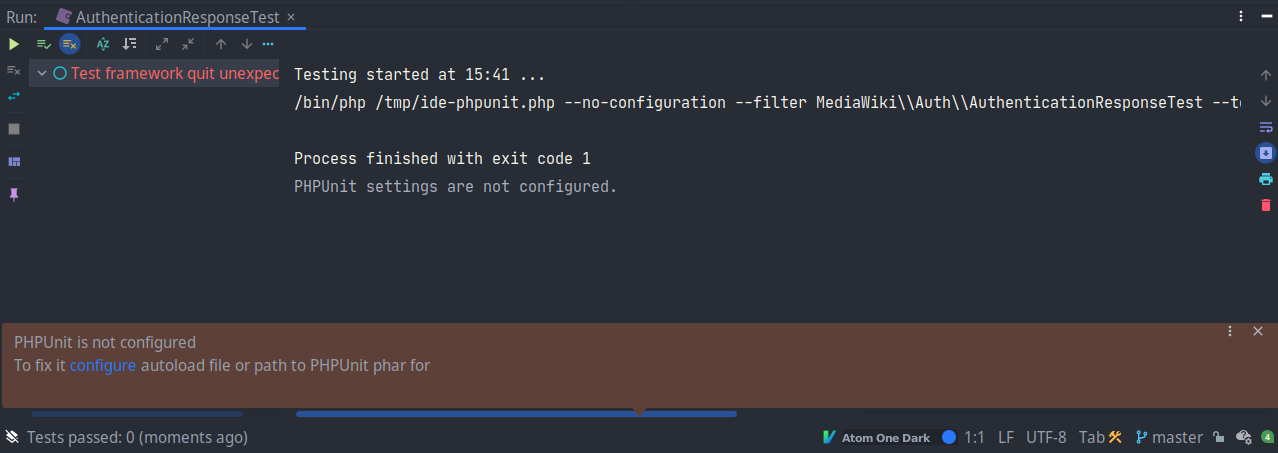
We are prompted to confirm the default PHPUnit configuration:
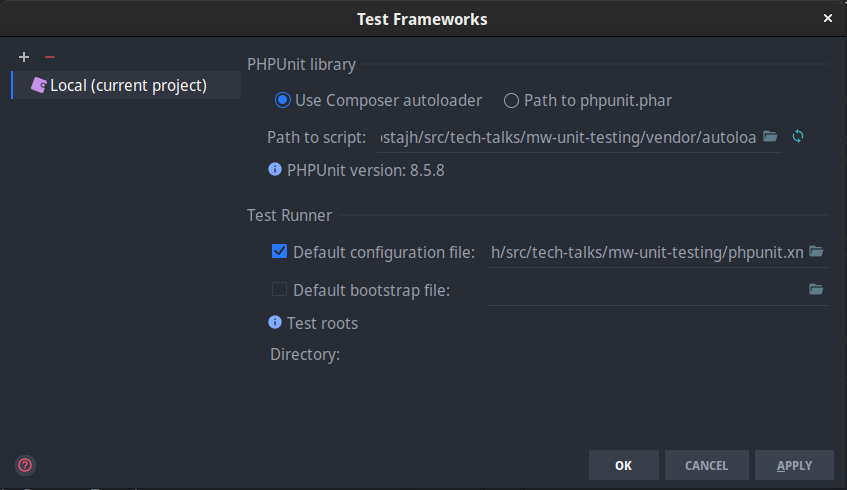
Just press “OK”, then press the green triangle again to run the test (or press shift F10, a keybinding worth memorizing!). And we can see:
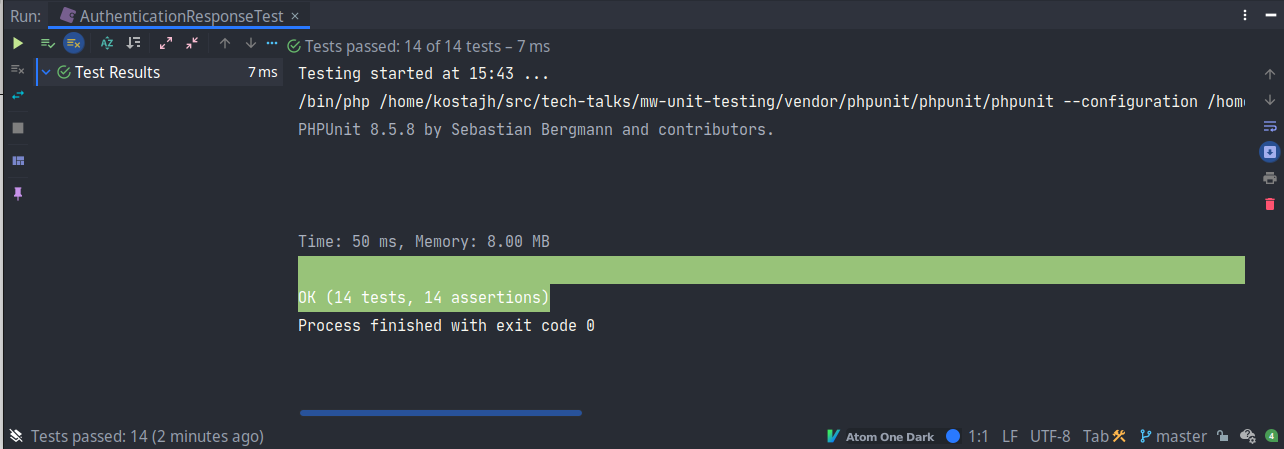
The tests passed!
Using the debugger
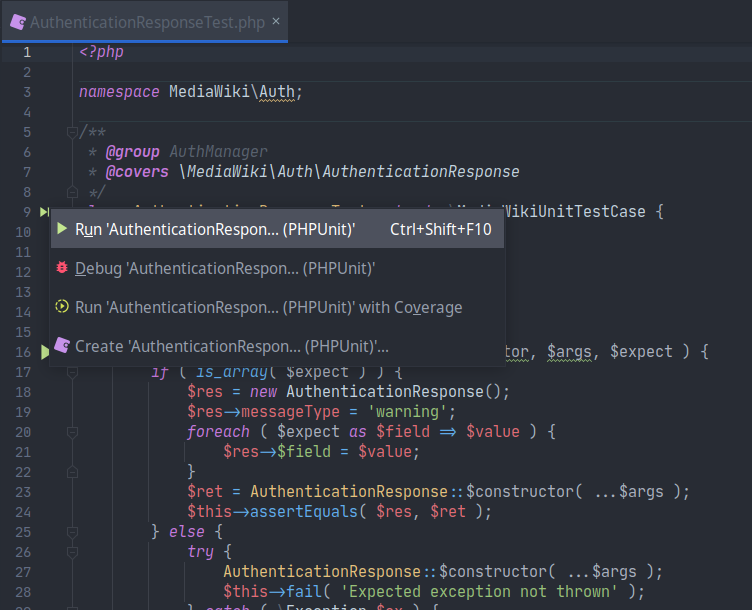
The single most useful thing about the integrated setup is that you can set breakpoints and inspect the context of your code in test execution. Starting from the “Play” menu next to a function or class, you can select “Debug”:
When the test execution reaches a breakpoint you’ve set, you’ll be able to inspect current state, navigate forwards in the code, and do any number of useful things to understand how your code or test is working (or not).
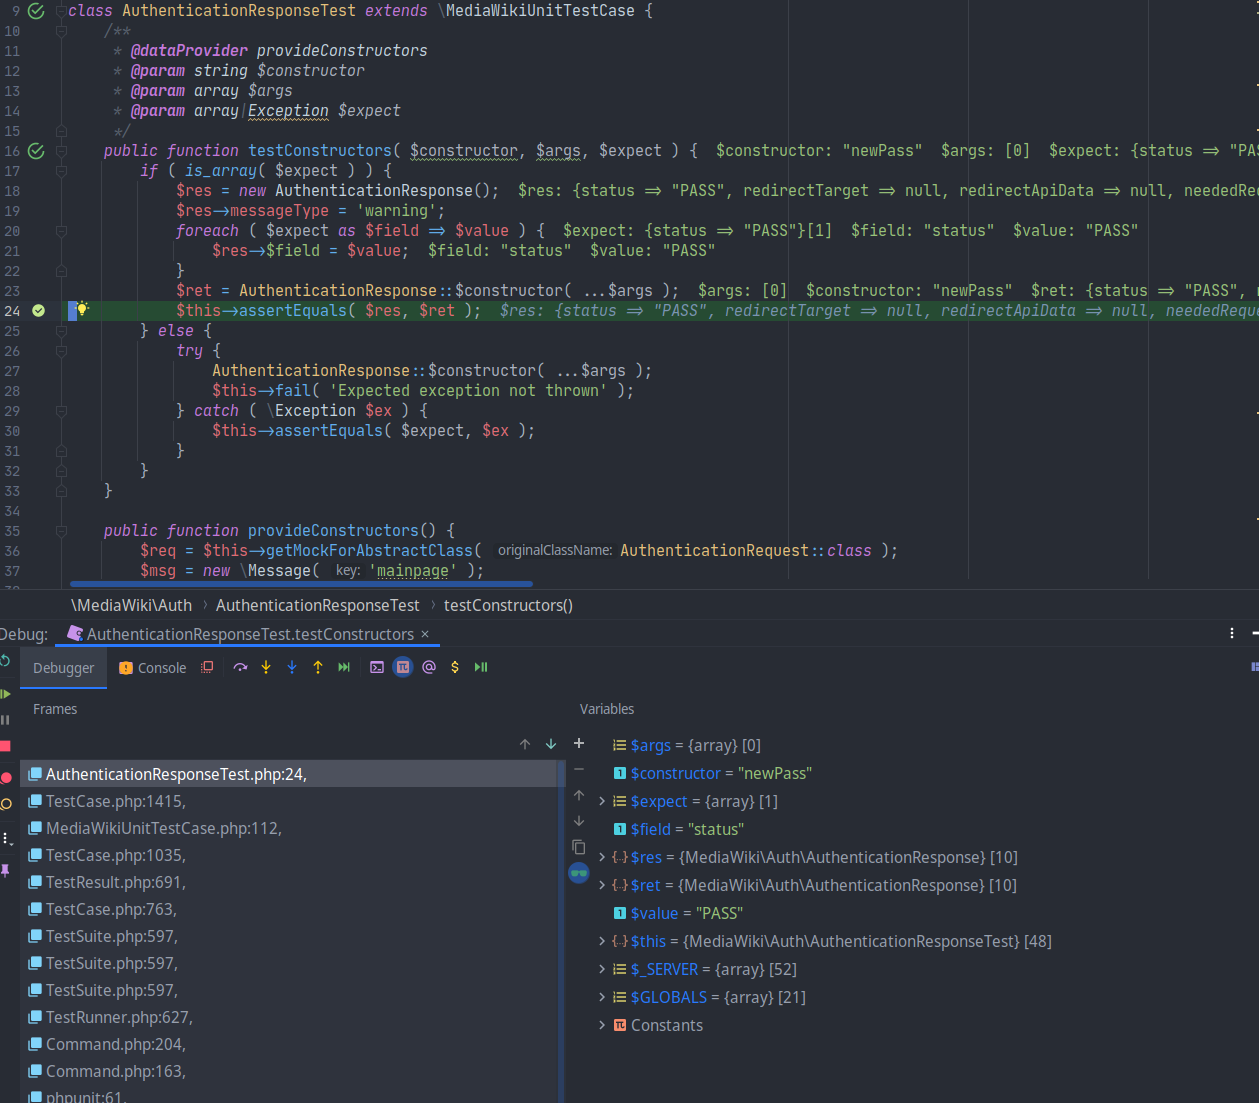
It’s hard to overstate how useful this is. If you haven’t experienced it yet… please stop what you’re doing and try it now :)
Generating code coverage reports
You can also generate code coverage reports and view the results in the IDE.
First, here’s how you can do it with the command-line interface: vendor/bin/phpunit --coverage-text {pathToTest}2:
? vendor/bin/phpunit --coverage-text tests/phpunit/unit/includes/auth/AuthenticationResponseTest.php
PHPUnit 8.5.8 by Sebastian Bergmann and contributors.

..............                                                    14 / 14 (100%)

Time: 176 ms, Memory: 12.00 MB

OK (14 tests, 14 assertions)


Code Coverage Report:
  2020-11-01 15:06:57

 Summary:
  Classes:  0.00% (0/1)
  Methods: 83.33% (5/6)
  Lines:   97.06% (33/34)

\MediaWiki\Auth::MediaWiki\Auth\AuthenticationResponse
  Methods:  83.33% ( 5/ 6)   Lines:  97.06% ( 33/ 34)
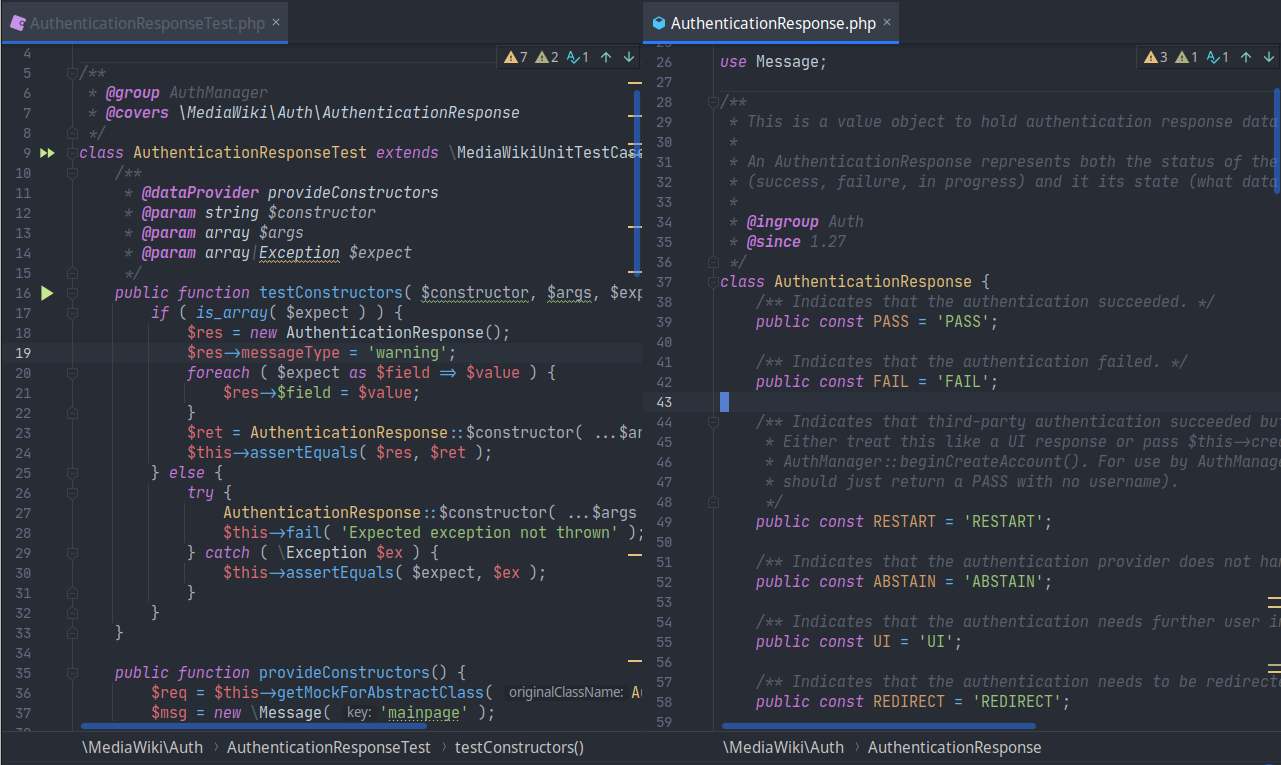
But again, this is a context switch to go back and forth from your editor to the terminal, so let’s do this within the IDE. First, I like to set up a split screen with the test class on one side and the class being tested on the other:
Then I select the “Run with Coverage” option:
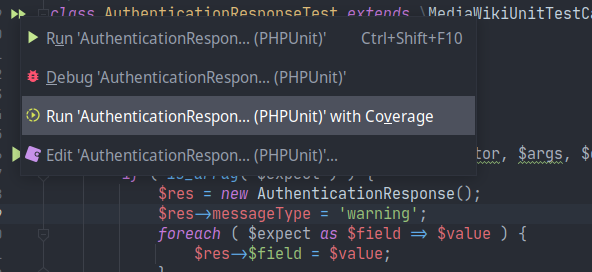
And voila, I can view the coverage report inline in my editor:
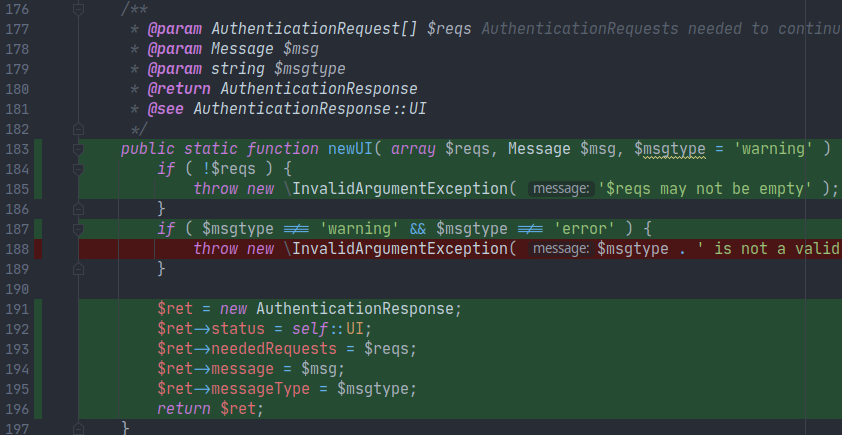
Having the side-by-side split of the test and class under test, along with inline coverage report, makes it really easy to see where you need more coverage and also doesn’t break your context as you write tests, run the tests, analyze the coverage, and write more tests.
Faster code coverage
As a side note, there is an important setup step that you need to take so that coverage generation is fast.
If you look at core’s phpunit.xml.dist, you’ll see towards the end:
<filter>
		<whitelist addUncoveredFilesFromWhitelist="false">
			<directory suffix=".php">includes</directory>
			<directory suffix=".php">languages</directory>
			<directory suffix=".php">maintenance</directory>
			<directory suffix=".php">extensions</directory>
			<directory suffix=".php">skins</directory>
			<exclude>
				<directory suffix=".php">languages/messages</directory>
				<directory suffix=".php">maintenance/benchmarks</directory>
				<directory suffix=".php">extensions/*/tests</directory>
				<directory suffix=".php">skins/*/tests</directory>
				<file>languages/data/normalize-ar.php</file>
				<file>languages/data/normalize-ml.php</file>
			</exclude>
		</whitelist>
	</filter>
This core PHPUnit configuration is saying, “when PHPUnit is run, do include includes/languages/maintenance/extensions/skins when calculating coverage, but exclude a handful of subdirectories”. If you have a lot of extensions/skins in your MediaWiki directory, or if you are writing tests for an extension or skin, you need to edit this filter configuration to only calculate coverage for the directories you care about. Editing this file by hand is described in the PHPUnit manual on MediaWiki.org but there is also a simpler way: composer phpunit:coverage-edit -- extensions/{extensionName}. For an extension or skin, you would run composer phpunit:coverage-edit -- extensions/{extensionName}.
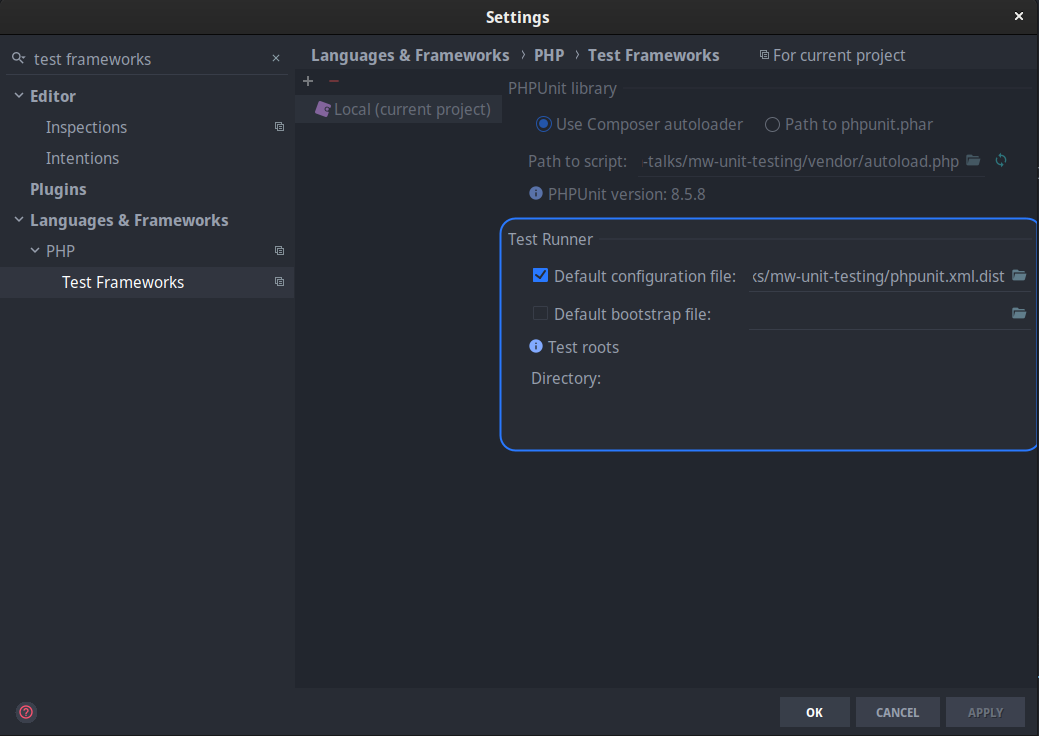
This script copies phpunit.xml.dist to phpunit.xml (not in version control) and edits the <filter> contents to just include the directories you care about. That way, generating coverage is much faster since PHPUnit ignores all the other code in the MediaWiki application when calculating lines covered. Just make sure to override the default configuration file in your IDE to reference phpunit.xml and not phpunit.xml.dist:
Bonus, configuration for MediaWiki-Docker / Vagrant
Note that you can set up PhpStorm to use a remote interpreter, meaning, when you press “Run test”, PhpStorm will use docker-compose exec to run the PHPUnit tests within a running Docker container, and then bring the results back into the IDE. While this has some advantages (consistency in PHP runtime, rather than relying on your host machine setup) the disadvantage is that it’s slower due to the overhead of running the docker-compose exec command.
If you’re using MediaWiki-Docker’s default configuration using SQLite, there’s nothing more to do here. If you’re using MySQL container(s), then add an entry to /etc/hosts like 127.0.0.1 {name-of-your-mysql-container}, and use docker-compose.override.yml to expose the 3306 port from the container to host. With MediaWiki-Vagrant you’d do something similar.
Writing unit tests
So, after a long detour explaining terminology, some theory, and instructions on how to run unit tests, let’s talk about how to write them!
What we won’t discuss
I’m leaving out of this blog post and talk details on how to write integration tests, except at a very basic level when it makes sense to clarify where unit test creation diverges from integration tests.
Getting started
The first thing to know is that you should separate your tests into unit and integration directories. If you are in MediaWiki core, you can look at tests/phpunit/unit and tests/phpunit/integration. If you are working in an extension, that extension should have tests/phpunit/unit and tests/phpunit/integration.
Writing your first test
Let’s suppose our PoliticalCalculator class is defined in a file called includes/utils/PoliticalCalculator.php and we want to write some unit tests for it. We should create a directory in tests/phpunit/unit/utils and then a file called tests/phpunit/unit/utils/PoliticalCalculatorTest.php.
That file would look like this:
<?php
class PoliticalCalculatorTest extends \MediaWikiUnitTestCase {

  public function testAdd() {
  }
}
A few things to note:
- The class should extend
MediaWikiUnitTestCase. That class extends PHPUnit’s standard TestCase, which provides a bunch of useful stuff that we’ll discuss shortly. MediaWikiUnitTestCaseis intentionally a pretty minimal class (compare withMediaWikiIntegrationTestCase). The main thing it does is attempt to unset the hundreds of globals that MediaWiki sets during its bootstrapping- Extending
MediaWikiUnitTestCasealso means that two traits are used,MediaWikiCoversValidatorandMediaWikiTestCaseTrait. The former validates that you’ve defined@coverstags and the latter provides a bunch of utility methods, including custom assertion methods, to help you in writing tests. - Each test method begins with the word
test(lower case) followed by words describing what is being tested.
YMMV, but it’s generally better to have each test method test one thing. For example, you don’t want testCalculator() which then tests addition, subtraction, multiplication etc etc. Instead you’d want testAdd, testSubtract, etc. And for our example where add() can work in a funny way, it would probably make sense to have testAdd() and testAddWithAuthoritarianMode() etc. Like your application code, try to make your test code methods concise, modular, and readable.
@covers tags
@covers tags are used to say “this test method covers functionality defined in methods X/Y/Z”. For our PoliticalCalculator, we’d have something like this:
<?php

/**
 * @coversDefaultClass PoliticalCalculator
 */
class PoliticalCalculatorTest extends \MediaWikiUnitTestCase {

  /**
   * @covers ::add
   */
  public function testAdd() {
  }
}
If you don’t do this, then code coverage generation doesn’t count the test as covering your application code. The reason the covers tags are necessary is because a lot of application code can be triggered secondarily by the code being tested, and it doesn’t make sense to claim that some distantly executed code is covered by your test when it isn’t.
Assertions
So far, our test doesn’t actually do anything. If we run it, we’ll see:
PHPUnit 8.5.8 by Sebastian Bergmann and contributors.

R                                                                   1 / 1 (100%)

Time: 55 ms, Memory: 8.00 MB

There was 1 risky test:

1) PoliticalCalculatorTest::testAdd
This test did not perform any assertions
Going back to the definition at the start: we need to pass in some inputs and verify outputs, so let’s do that now.
/**
 * @covers ::add
 */
public function testAdd() {
  $validator = new Validator();
  $calculator = new PoliticalCalculator( $validator );
  $this->assertSame( 4, $calculator->add( 2, 2 ), 'Addition works properly.' );
}

/**
 * @covers ::add
 */
public function testAddInAuthoritarianMode() {
  $validator = new Validator( 'authoritarian' );
  $calculator = new PoliticalCalculator( $validator );
  $this->assertSame( 5, $calculator->add( 2, 2 ), 'Addition works properly.' );
}
I recommend typing $this->assert and scrolling through the list of possible assertions, or better yet, visit vendor/phpunit/phpunit/src/Framework/Assert.php in your editor and look through to see what tools are available to you.
Mocks
In the above examples, we are fortunate in that Validator doesn’t have any interaction with global application state, so it’s easy for us to create a new instance of it and inject it to PoliticalCalculator. But suppose that Validator needed a database object in its constructor instead of a string for obtaining the mode (e.g. it needs to find the mode from a value stored in the database). Our validator class would look like this:
class Validator {

  private $db;
  public function __construct( IDatabase $db ) {
    $this->db;
  }

  public function validate( $result ) {
    if ( $result->type === 'add' ) {
      if ( $result->params = [ 2, 2 ] &&
        $this->db->selectField( 'config', 'mode' ) === 'authoritarian' ) {
        return 5;
      } else {
        return $result->calculation;
      }
    }
  }
}
Now we have a problem. How can we continue writing our test even though we don’t want to access the database?
In PHPUnit, you commonly solve this problem using mocks. A mock provides a way to pretend that you have an object of a certain type, but you are responsible for defining exactly how it behaves.
For example, we could rewrite our test to use a mock:
/**
 * @covers ::add
 */
public function testAddInAuthoritarianMode() {
  $dbMock = $this->getMockBuilder( \IDatabase::class )
			->disableOriginalConstructor()
      ->getMock();
  $dbMock->method( 'selectField' )->willReturn( true );
  $validator = new Validator( $dbMock );
  $calculator = new PoliticalCalculator( $validator );
  $this->assertSame( 5, $calculator->add( 2, 2 ), 'Addition works properly.' );
}
We have created a mock for the database object, and have said that if selectField is called on that object, to return true. This is a very powerful set of tools and at the core of writing good unit tests: you can define how many times you expect the method to be called, what to return when specific values are passed to methods to the mock, etc.
Data providers
In the previous examples, you can see that we’re testing for a limited set of scenarios. As we add more scenarios, we could make new test methods for each scenario, or we could use a data provider function to provide input and outputs for our test:
/**
 * Data provider for testAdd().
 */
public function addProvider() : array {
  // Returns a list of test cases
  return [
    // test case 1
    [
      // input
      [ 2, 2 ],
      // output,
      4,
      // use authoritarian mode
      false
    ],
    // test case 2
    [
      [ 2, 2 ],
      4,
      true
    ]

  ];
}


/**
 * @dataProvider addProvider
 * @covers ::add
 */
public function testAdd( $input, $output, $useAuthoritarianMode ) {
  list( $a, $b ) = $input;
  $dbMock = $this->getMockBuilder( \IDatabase::class )
			->disableOriginalConstructor()
      ->getMock();
  $dbMock->method( 'selectField' )->willReturn( $useAuthoritarianMode );
  $validator = new Validator( $dbMock );
  $calculator = new PoliticalCalculator( $validator );
  $this->assertSame( $output, $calculator->add( $a, $b ), 'Addition works properly.' );
}
Note, it’s best to avoid the urge to do a bunch of complicated stuff in the data provider function. Use flags in the data provider to decide how mocks should be constructed in your test() function.
When should I write tests?
That’s pretty much it when it comes to writing unit tests. (Unlike MediaWikiIntegrationTestCase, there is not a lot here that is MediaWiki specific.)
We’ve talked about why and how you can write unit tests, but we haven’t yet discussed when. While that’s of course totally up to you, some things that are useful to consider:
- Test driven development (TDD) is a thing; the idea is that you write your tests, then write the code that passes the tests, then continue that cycle until your software meets the project specifications. This is, in my experience, really difficult to do, even putting aside the other challenges of working in a code base that is heavily mixed between modern / dependency injection and legacy / globals.
- You can write your application code, then at the very end go back and write unit tests. The risk with this approach is that you may decide you don’t have time and move on to something else, or just forget, or not feel like going the extra effort for something that wouldn’t show up in the product.
- Still, this approach is better than nothing. At the very least, you might end up discovering some bugs in your application logic before the person reviewing your code does, or before it lands in production
In between these two “extremes” is an idea that I will take no credit for, because I read it somewhere and now can’t find the reference, which is to treat your unit tests like “pitons”. When climbers ascend a mountain, they hammer in pitons to the rock face to help them secure their progress, and mark the way for future climbers. Writing unit tests can work the same way – it should be something to help you secure your gains as you build out the methods in a class or series of classes, so that you can feel confident to refactor and change knowing that the end product functionality is still there.
 (Jarek Tuszyński / CC-BY-SA-3.0 & GDFL, CC BY-SA 3.0 https://creativecommons.org/licenses/by-sa/3.0, via Wikimedia Commons)
Next steps
I hope this post helps clarify how to get started with unit testing in MediaWiki. Some resources to help you:
- Learn from examples: seek out
tests/phpunit/unitdirectories in core or extensions - MediaWiki.org docs: https://www.mediawiki.org/wiki/Manual:PHP_unit_testing
- Code health developer education workshops: https://www.mediawiki.org/wiki/Code_Health_Group/projects/DevEd/Workshops
If you want to contribute to improving the unit testing infrastructure in MediaWiki, there are lots of tasks that need some love:
- T87781 - Split mediawiki tests into unit and integration tests
- T90875 - Convert tests/phpunit/phpunit.php entrypoint to plain PHPUnit with bootstrap file
- T266441 - Some unit tests are not executed with composer phpunit:unit
- MediaWiki-Core-Testing - 111 open tasks for PHPUnit